Adding a Calculate Button
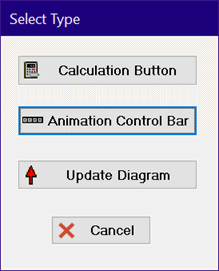
One or more Calculate buttons can be placed on the Diagram window (and on child Diagram windows) by selecting the Create Calculate button in the Diagram window tool bar. In the Professional license, the small window shown below will appear with four buttons. Click the Calculation Button. The Calculate Button Characteristics dialog will appear.
By default, the Calculate button caption is "Calculate" and pressing the button provides the same function as selecting Solve from the Calculate menu or pressing F2. The button can be alternatively configured to initiate the Solve Table, Min/Max, Min/Max Table, Uncertainty Propagation, Uncertainty Propagation Table, update the Diagram window or Reset the problem Resetting the problem resets the random number generator seed. It also sets all Diagram input equations to 1 (i.e., removes the equations). The calculate button caption and the action taken when the Calculate button is clicked can be changed by right-clicking the button and providing the desired text while in development mode. A bitmap picture can also be optionally displayed on the button.
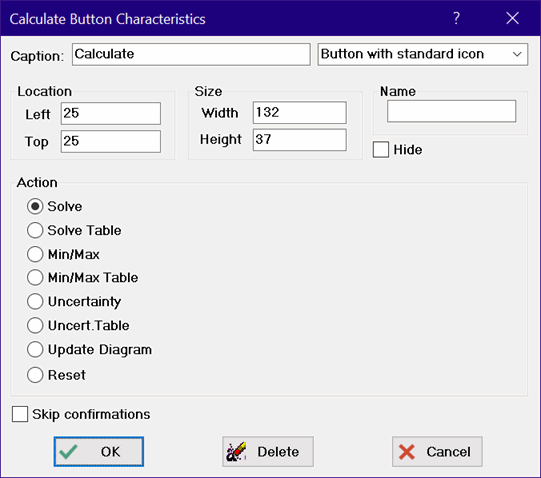
While in development mode, the Calculate button can be dragged to any location on the window. Finer positioning is available by pressing the left, right, up, or down arrow keys which move the button one pixel for each press. The width and height of the button can be changed by holding the Ctrl key down while pressing arrow keys. The right arrow increases the button width by one pixel. Left arrow decreases the width. Down arrow increases the height and up arrow reduces the height.
If the Calculate button is configured to solve a table, the first and last rows in the table will be the same values as used the last time the table was solved. In the Professional license, the first and last rows can be specified with EES variables in the Solve Table dialog and their values can be entered in the Diagram window.
Note that multiple Calculate buttons can be placed on the Diagram window and configured to do different tasks, i.e., Solve, Solve Table, Update Diagram, etc. Multiple Calculate buttons are useful in conjunction with the $IF directive.
In the Professional license, the Calculate Button Characteristics dialog will have a field enabled in which a name can be entered for this calculate button. By default, this field is blank. If a name is provided, EES will create variables Name.left, Name.top, and Name.hide. (If an array name is provided, e.g., Name[1], the created variables will be names Name.left[1], Name.top[1], and Name.hide[1]). The created variables can optionally be assigned values in the EES program or with Radio button or Check box objects. For example, the visibility of the Calculate button created in the above dialog can be controlled by EES variable CalcButton1.Hide. Setting
CalcButton1.Hide=true#
or more simply, just entering
CalcButton1.Hide
To restore visibility enter CalcButton1.Show as an equation. If an array name is used, e.g., Name[1], the visibility of the button can be specified with Name[1].Hide and Name[1].Show;
in the Equations window or in the command fields of a Check Box or Radio Button will cause the button to be hidden when the Diagram window is in Application mode. CalcButton1.Show will cause the button to be visible when the command is executed. The Calculate button will always be shown in the Development mode, regardless of the setting of the Hide check box of the value of Name.hide.
The attributes of the button can be copied to EES variables using the GetAttributes function.