Creating the Diagram
The Diagram window and child diagram windows (Professional license) provide a drawing environment in which you can create a picture representing the problem at hand. Alternatively graphics from an external application such as Microsoft PowerPoint, can be pasted into the Diagram window. You can also place text and buttons on the drawing. In the Professional license, you can animate the drawing and text. The text can be descriptive text, input variables, or output variables. The Professional license also supports formatted text and tables and slider inputs. Buttons can be used to initiate calculations, show plots, display help, link to other programs, print, show movies or for other purposes.
There are three ways to place graphic items in the Diagram window. First, a graphic item can be created in any drawing program that produces an object drawing such as Microsoft PowerPoint. Copy the drawing and then Paste it into the Diagram Window while in development mode. A scanned image or picture can also be used as the diagram provided that it is copied as an picture, rather than a bitmap or .jpg file. An easy way to convert any graphic into a picture is to paste the bitmap into PowerPoint, PaintBrush or other program that converts graphical images. Then copy the image from this program into the Diagram window. The second way to place a graphic item in the Diagram window is to use the diagram window toolbar. The toolbar, which can be made visible using the Show/Hide Diagram Tool bar menu item, provides capability to draw graphic primitives such as lines/arrows, circles, and rectangles. Click on a toolbar button and then draw the graphic item in the Diagram window. In the Professional license, a file containing a graphic item can be opened directly and displayed in the Diagram window by clicking the Add Picture button (![]() } in the Diagram Window toolbar.
} in the Diagram Window toolbar.
When the toolbar is visible, the Diagram Window is in development mode and changes can be made to the diagram. Any item on the Diagram window can be dragged to a new location. The arrow keys can be used for fine movements. Right-clicking on any graphic or text item will display a pop-up menu of options including Cut, Copy, and menu items to move the graphic forward or backward. The foremost items are shown in front of those further back.
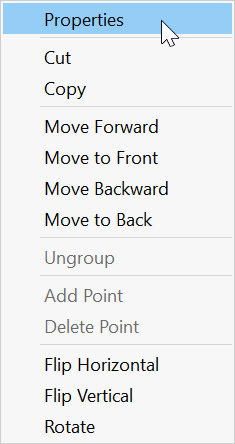
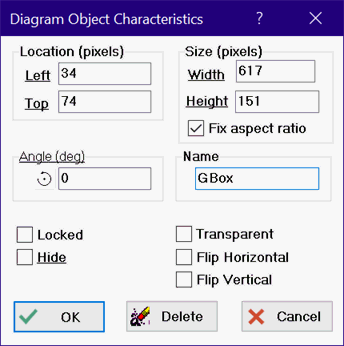
The pop-up menu provides a Properties menu item. Selecting the Properties menu item (or double-clicking on the item) will bring up the properties dialog for that item and then the characteristics of that graphic item can be changed by modifying the fields in the dialog. The properties dialog provides inputs for the location (top-left corner) and size of the graphic object.
Some graphic items can be flipped or rotated using the menu commands in the pop-up menu. The rotate command will rotate the object 90 counter-clockwise each time it is used. This command is only available in the Professional license. It is also possible to specify an arbitrary rotation angle in the Properties dialog for the selected object.
In the Professional license, the graphic object can be given a name. The name can then be used to assign attributes to the graphic item with EES variables in the Equation window or Parametric table. For example, the left and top of the item represented in the dialog below could be specified with EES variables GBox.left and GBox.top, respectively. If GBox.Hide is set to a non-zero (true) value, the object is not displayed. (Objects are visible and return to the location specified in the dialog when the Diagram window is in development mode). The values of EES variables that are used in this manner can be conveniently set using a Drop-Down list item. A common use for this capability is to have EES display one of several pictures, depending on the selection from the drop-down list. An example of this capability is provided in the Movable_Figures.EES example file. This example can be opened by selecting Diagram Window from the Examples menu and then selecting the Movable Figures item. A more powerful application of this capability is animation.