Modify Plot
There are different formats for the Modify Plot dialog, depending on whether it is a X-Y plot, bar plot, Contour/Gradient plot, polar plot 3-D Points plot or a Symbol Color plot. The Modify Plot dialog can be accessed using the Modify Plot menu command or by double-clicking (or right-clicking) the mouse button anywhere within the plot rectangle (or circle for Polar Plots) in the Plot window. For 3-D Points plots, a Modify Plot button is provided in the 3-D Plot Control Panel.
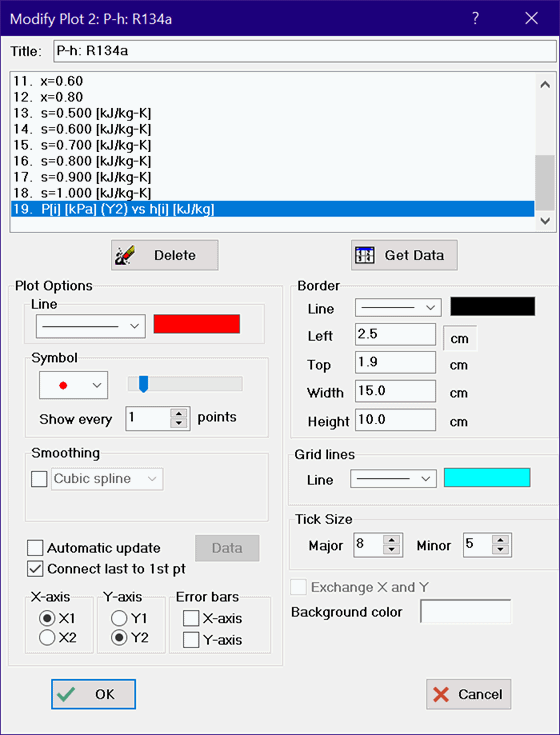
Modify Plot allows the parameters of existing plots to be changed. In addition, plot window parameters such as the plot size, border type, error bars, and major/minor tick sizes can be changed. The left and top edit fields determine the top left corner of the plot rectangle when it is displayed in a Plot window. The width and height specified in this dialog determine the size that the plot will be when it is displayed, printed or copied via the clipboard to another application.
The plots lines appearing in this plot window are shown in the list box at the top of the dialog. The last plot line in the list is preselected as you enter this dialog window. Select the plot line for which changes are to be made. The line type, color, symbol, symbol size, smoothing and other plotting parameters will be displayed for the selected line. Note that an area plot can be produced by selecting the area option in the line type menu. Multiple plot lines can be selected and the changes will be made for all selected lines. A range of plot lines can be selected by clicking the first plot line in the list, holding the Shift key down and then clicking the last plot line.
The size of the plot symbol is controlled with a slider control in the Symbol group, seen in the above figure. Placing a symbol at each point can result in a messy plot when the line has many points. The Show every control is provided to specify symbols be drawn every N points where 1<N<# of points.
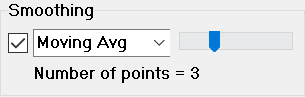
To enable smoothing, click the check box within the Smoothing group. There are three smoothing options, accessible with a menu box control. The first option is a spline fit that smoothly tries to direct the line through all points. The second option is a polynomial fit. The order of the fit can be changed from 1 to 7 by moving the slider. The smoothed line will not necessary pass through all of the data points. The third option is a moving average that is intended to reduce scatter when experimental data are plotted. A slider will appear as shown below. Moving the slider to the right increases the number of data points that are used to compute the moving average and thus reduces the scatter in the data. The plot is updated as the slider is moved so the effects of a change can be viewed. The number of points used is displayed below the slider.
The plot list will indicate (X2) or (Y2) if the plot uses the X2 (top X-axis) or Y2 (right Y-axis) scales. Controls to select the X1/X2 and Y1/Y2 scales are available for plots in which second X or Y axis scales have been defined.
The error bars control allows error bars to be placed in the horizontal, vertical or both directions. Error bar information can come from one of two sources. If calculations are initiated with the Uncertainty Propagation Table command, the error bar information is assumed to be the calculated or specified uncertainty values for the variables plotted on the X and Y axes. If the Uncertainty Propagation Table command is not used, clicking the X-Axis or Y_axis check box in the Error bars box will bring up the Specify Error Bar Information dialog in which the data needed to draw symmetric or unsymmetric error bars is entered.
When the 'Automatic Update' control is selected, the plot will use the current data in the table from which the plot was developed, rather than the data that existed in the table when the plot was first drawn. In addition, the plot will be animated if the calculations are started with the animation control bar in the Diagram window. The data can be plotted from the Parametric, Lookup, Arrays, or Integral tables. Any change in the data will cause the plot to be redrawn before it is displayed. The Data button to the right of the Automatic Update control will bring up the Modify Automatic Plot Data dialog in which the source of the data and range of rows used to construct the plot may be changed. Click OK to accept the changes or Cancel.
The 'Connect last to 1st pt' checkbox will, if checked, draw a line between the last point and the first point, thereby closing a loop. This option is useful when plotting the state points of thermodynamic cycles.
Note that multiple plots can be selected by holding the left mouse button down and moving (or dragging) it over other plot names in the plot line list. In this case, the plot line parameters will be displayed for the last selection. If a change is made to a parameter, that change will be applied to all selected plots when the OK button is clicked. This capability makes it easy to, for example, change the size of the symbols for all plots in the plot window at one time. Other parameters can be changed in a similar manner. However, the data sources (accessed with the Data button) are disabled when more than one plot is selected. It is possible to change the range (First Row and Last Row) of all selected plots at one time provided that they were all plotted from the same table.
Plots are drawn in the order shown in the plot line list. In some circumstances, it is advantageous to change the order in which the plots are drawn. This is particularly true for area plots. The order can be changed by selecting a plot line and dragging it to the desired location with the right mouse button. When the order is changed, reordered will be displayed below the left corner of the plot line list. The reordering is not actually done until the OK button is clicked.
The major and minor tick sizes refer to the length of the tick in pixels. Note that positive tick sizes indicate that the tick marks are directed into the plot rectangle whereas negative tick sizes result in tick marks that are outside of the plot rectangle.
The 'Exchange X and Y' check box exchanges the X and Y axes. This control is disabled if there is a second X or Y axis scale.
The Background color for plots is by default, white. However, clicking in the box to the right of the Background color label will bring up a color selection dialog that allows the background color to be selected.
The Modify Plot dialog window allows the characteristics of one or more plots to be changed without exiting the dialog window. The changes are shown in the plot window. However, the changes become permanent only after the OK button is clicked. Clicking the Cancel button will restore the plot(s) to the condition it was in before the Modify Plot dialog window appeared.
The Delete button will remove the selected plot(s) from the plot window, leaving all others unchanged. If a legend text item has been associated with the plot with the Add Text command, it also will be removed. The plot window is immediately redrawn. However, the plot is deleted only when the OK button is clicked. Clicking cancel will restore one or more deleted plots.
The Delete button is intended for deleting individual plot lines. Use the Delete Plot Window command to clear a selected plot window.
The Get Data button will retrieve the data used to construct a plot and save it in a Lookup Table. Clicking the button will provide a prompt of the name of the table.
Return to Plot menu.